Monday, September 19, 2011

Meatless Mondays - Roasted Tomato and Swiss Chard Pappardelle


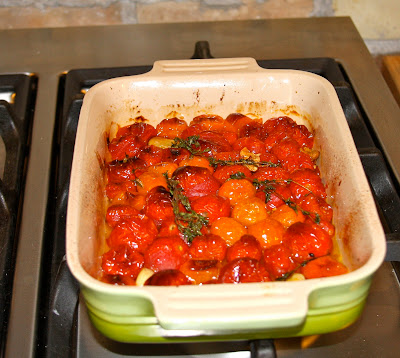
Roasting tomatoes and garlic brings out the sweetness inherent to both. When combined with the sharp cheese, creamy pine nuts and fresh herbs this dish is simple yet the flavours are full and comforting. I recently made this dish for a friend of mine who is expecting and does not want to eat anything but tomatoes!! For her, I removed the vermouth and used Parmesan instead of Chevre, which was equally good!


Roasted Tomato and Swiss Chard Pappardelle

2 pints mixed cherry and grape tomatoes
3-4 cloves garlic, crushed and roughly chopped
1 bunch fresh herbs (I've used rosemary, oregano, basil and thyme)
1 bunch Swiss chard
 2/3 cup dry vermouth
fresh or dry pappardelle pasta nests (about 375 g)   
10-15 fresh basil leaves, chopped
1/4 cup pine nuts
small bunch Italian flat leaf parsley, chopped  
handful of fresh basil, chopped
olive oil
salt and pepper 
Chevre / Parmesan / Pecorino


1.    Preheat oven to 400 degrees. 

2.    In an oven proof dish, combine 2 T olive oil, garlic, tomatoes, bunch of fresh herbs (reserve parsley and handful of basil for later use), and a large pinch of salt and pepper (about 1.5 t of each). Roast for 10-15 minutes. (keep an eye on them, they are done when they are well blistered). Remove from oven and set aside (This can be done ahead of time and then you can reheat them when you make the sauce). When you are ready to use, remove the bunch of fresh herbs and discard. 

3.    Boil water for pasta and add 1 T salt to the water. Add the pasta, and cook according to package directions.  

4.    Meanwhile, in a separate saute pan, brown the pine nuts in the dry pan, remove, and set aside. 

5.    Chop Swiss chard. In the same saute pan as above, heat 1 T of olive oil, add Swiss chard, salt and pepper, and saute until Swiss chard is wilted.  

6.    When the Swiss chard is wilted, add the tomato mixture and simmer for 2-3 minutes until the flavours come together. Add half of the fresh chopped herbs (parsley and basil), and 3/4 of the pine nuts. Stir to combine. 

7.    When the pasta is done, drain, but retain at least 1 cup of the cooking water. Add pasta to the pan with the sauce and toss to combine. If it seems like it needs more liquid, add some of the cooking water, about 2 T at a time, until the sauce coats the pasta. 

8.     To serve, top with remaining herbs, pine nuts and the cheese of your choice. 
 

Sunday, September 18, 2011

Summer Garden Salad


As summer winds down this week, I am coming to terms with the end of another warm season. The leaves are just starting to change and soon we will be seeking the warming comfort of stews, homemade bread and soups. Summer always passes too quickly, with so many exciting obligations, cottages, vacations, pools to be enjoyed! I never get as much time to blog as I plan!

I wanted to spend this last week celebrating our garden. This year we had a huge garden. It was a lot of work but we have been harvesting the benefits for months now. By far the star of our garden this year was the beautiful tomato. We planted, in total, 67 plants. Yes, a tad excessive. But we have had fun trying all of the new heirloom varieties. I can say that I have eaten tomatoes, in some form, at almost all meals for about two months now and I am still craving them. I think I could live on tomatoes like these, daily, for the rest of my life! So, many of the recipes this week have that theme (perhaps I will call it an homage to the tomato).

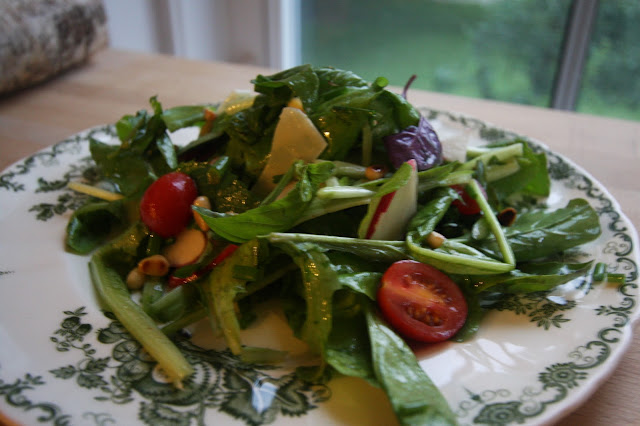
My first recipe, however, is created from a mixture of many of the vegetables in our garden. All of the veggies, herbs and lettuce used in this salad come from the garden (save and except for the pine nuts). This is an easy summer classic garden salad. I make it regularly throughout the season. It is an excellent way to celebrate the harvest, add whatever you have fresh on hand!

Summer Garden Salad
3 or 4 large handfuls of lettuce (I used arugula and Boston bib)
1 bunch of french breakfast radishes, sliced thinly
large handful of mixed herbs (I used chives, basil, mint, oregano and parsley)
large handful of fresh mixed grape tomatoes, halved 
garden cucumber, sliced thin
small handful of toasted pine nuts

Dressing:
 
Salt 
Pepper
Olive Oil
Lemon Juice
Dijon Mustard
White Balsamic Vinegar

Friday, July 1, 2011

Grilled Jumbo Shrimp and Oysters with Herb Butter


In honour of Canada Day, here is one of my favourite recipes for grilled seafood, given that grilling is one of Canada's favourite pastimes, and definitely the way that I will be celebrating the day! There is something so fantastic about sitting outside, enjoying the weather, grilling with a beer in hand!

This recipe can be used for almost any type of seafood. Halved lobsters work well as do scallops, mussels etc. You can also change up the herbs to include whatever you have fresh on hand!


Grilled Jumbo Shrimp and Oysters with Herb Butter

2 lbs jumbo shrimp
12 oysters
large handful of fresh herbs (tarragon, chives, parsley, mint), chopped
2 cloves garlic, chopped fine
1 t smoked paprika
2 T olive oil
3 T butter
salt and pepper

Remove vein and legs from shrimp and butterfly from the top, keeping shell attached.
Wash oysters well to remove all excess grit and sand.
Combine olive oil, 1 clove garlic, paprika, salt, pepper and shrimp in a bowl. Let marinate for twenty minutes.
Melt butter in a small sauce pan, combine melted butter with fresh herbs, and remaining clove of garlic.
Grill oysters and shrimp over medium high heat until shrimp is pink and oysters are opened. As oysters open, brush with butter and herb mixture.
Remove from grill and toss with butter and herb mixture.
Season with salt and pepper.

Enjoy with crusty bread and a crisp refreshing white wine.

Happy Canada Day!!!

Monday, June 27, 2011

Strawberry Shortcake with Vanilla and Basil Spiked Whipped Cream


I love love love strawberry Shortcake. I am speaking of the desert here, and not the cartoon, although I do have a special place in my heart for her as well. When I was little one of my favourite movies was "Strawberry Shortcake in Big Apple City". Strawberry is the big winner of a nation wide cooking contest and she wins a trip to "Big Apple City" in order to compete in a big bake-off at "the little theater off Times Pear!!" (she makes Strawberry Shortcake!) Sometimes I wonder why I am a lawyer ... I digress!!


The shortcake recipe was inherited from my Grandmother Gerrie! My mother has been baking it up for me for all of my life and it is my favourite. I always look forward to this time of year, when the local strawberry farms are full of beautiful sweet berries. The season is so short so take advantage while you can!


Grandma G's Shortcake:

2 cups all purpose flour
3 T sugar
3 t baking powder
1 t salt
1/3 cup shortening or lard
1 cup milk (2% or whole milk)
2 T butter - cut into small pieces


Heat oven to 450 degrees.

Sift flour, sugar, baking powder and salt in a bowl.

Cut in shortening, then stir in milk until just blended.

Mixture will be thick.

Spoon Mixture into an 8" x 8" square greased pan and dot with butter.

Bake for 15 - 20 minutes.


Strawberries w/ Vanilla and Basil Spiked Whipped Cream

2 pints fresh strawberries, hulled and halved
2 T basil
1/4 cup icing sugar
1 1/2 cups whipping cream
1 vanilla bean

Place Strawberries in a bowl, top with 1 T icing sugar and 1 t basil. Stir until the sugar dissolves.
In the bowl of a mortar and pestle, combine remaining basil and icing sugar. Smash until the basil is well bruised and the sugar and basil are well acquainted!
In a clean metal bowl, whisk together whipping cream sugar + basil mixture, and the insides of the vanilla bean, until soft peaks are formed.

Serve by slicing a piece of the shortcake in half, load the bottom half with as many strawberries and cream as possible, then top with the remaining half!

Bliss!!

Monday, May 30, 2011

Meatless Mondays ... Quinoa Burgers!


This recipe is adapted from Martha Stewart's "Whole Living Website". The website is full of fantastic recipes which are healthy and really delicious! She also has ideas for life balance, green living tips, fitness ideas and lots more information designed to help the reader live a full, balanced and healthy lifestyle!

This recipe is my favourite veggie burger recipe. As summer has arrived (semi-officially, marked by the Victoria Day weekend last weekend and the Memorial Day weekend for Americans this past weekend) it is the beginning of burger season in my house!! The recipe calls for pitas, which are great, but I also love them on whole wheat English muffins!! If you skip the Tzatziki sauce and replace the egg with egg substitute, you can make this recipe vegan!

Quinoa Burgers
1/2 cup rinsed quinoa, cooked
1 medium carrot, chopped coarsely
6 T, chives, chopped finely
15 ounces white navy beans, drained and rinsed
1/4 cup plain dried breadcrumbs
1 large egg, lightly beaten
1 T ground cumin
1 t coarse salt
1 t ground pepper
2 tablespoons olive oil

Tzatziki Sauce
1/2 cup plain nonfat Greek yogurt
1 T lemon zest
1 T fresh lemon juice
1 small clove garlic, chopped fine
1/2 English cucumber, shredded and drained


Place the carrots in the bowl of a food processor, fitted with the chopping blade attachment. Pulse until the carrot is very finely chopped.

Add cooked quinoa, chives, beans, breadcrumbs, egg and spices to the carrot. Pulse until mixture is combined but still slightly chunky.

Form into four equal sized burger patties. Refrigerate for half an hour, or until firm.

Heat oil in a non-stick skillet (I prefer a cast iron skillet) over medium heat. Cook burgers until browned and cooked through, approximately 8-10 minutes per side.

To make sauce, combine ingredients in a bowl and serve!

Tuesday, May 10, 2011

Dark Chocolate Cupcakes!!

I had been on the search for the best chocolate cupcake recipe for a while. I have tried a number of recipes, however I found one that comes from an old Cooks Illustrated, which has got to be the best I've found (so far!!). I really like cream cheese frosting with my chocolate cupcakes (or my red velvet cupcakes or my vanilla cupcakes or my carrot cupcakes ...), you could also do a devils chocolate icing if you want an extra boost of chocolatey goodness!! I've included the recipe for cream cheese icing as I think it is more colourful for Spring!


Dark Chocolate Cupcakes

~ makes 12 cupcakes, do not double, if you need 24 make two separate recipes ~

1/2 cup butter (1 stick), cut into 4 pieces
2 oz bitter-sweet chocolate, chopped
1/2 cup Dutch-processed cocoa
3/4 cup unbleached all purpose flour
1/2 t baking soda
3/4 t baking powder
2 large eggs
3/4 cup sugar
1 t vanilla extract
1/2 t salt
1/2 cup sour cream

Preheat oven to 350 degrees.

Line a standard size muffin pan with cupcake liners.

1. Combine butter, bittersweet chocolate and cocoa in a heat proof bowl. Place bowl over a pot of lightly simmering water, you may also use a bain maire / double boiler for this purpose, if you have one of these.

2. Heat the chocolate mixture until it has melted. Whisk to achieve a smooth consistency. Remove from heat and set aside to cool (to the touch).

3. In a separate bowl, sift together flour, baking soda and baking powder.

4. In the bowl of an electric mixer, whisk eggs to combine. Whisk in sugar, vanilla, and salt until fluffy and fully incorporated.

5. Add chocolate mixture to sugar and egg mixture and whisk until fully combined.

6. Switch to paddle attachment. Add 1/3 sifted flour mixture. Mix to just combine.

7. Add sour cream and mix to just combine.

8. Add remaining flour mixture and mix to just combine.

9. Divide batter, evenly, among muffin pan cups.

10. Bake for 18-20 minutes, or until a cake tester, inserted into the center of the cupcake, comes out clean.

11. Remove and cool for 10 minutes then remove cupcakes to wire rack and let cool to room temperature, prior to icing (about 30 minutes).


Cream Cheese Icing:
1 package cream cheese, softened
1/4 cup butter, softened
1 t vanilla
2 cups icing sugar

In the bowl of an electric mixer, beat the cream cheese and butter until very well combined (whipped).
Add vanilla and mix well to combine.
Slowly add the icing sugar, 1/2 cup at a time, until fully incorporated.
Taste, for sweetness and consistency.
Add more icing sugar if you find that it is too loose or not sweet enough!
Once desired consistency is reached, add food colourings to colour the icing to the colour of your choice.
Thursday, May 5, 2011

Shrimp Quesadilla - Cinco de Mayo!!


Happy Cinco de Mayo everyone!!

I am a big fan of Mexican food (who isn't)! It has to be one of the easiest foods to love. I have a particular fondness for spicy cuisine in any form and Mexican is among my favourites (plus who doesn't want an excuse to make Margaritas!)

This recipe for Shrimp Quesadillas is simple and quite flavourful. You can add as much spice as you can handle in the form of jalapeno peppers or thai chilies. If you want to control the spice, make sure you remove the seeds and white pith from the inside of the pepper, prior to chopping. If you like it hot, leave it in!!

Buen Provencho!!


Shrimp Quesadillas

4 6-inch whole wheat tortillas
1/2 lb shrimp, peeled and deveined
100 g queso fresco or goat cheese
zest of 1 lime
1/2 cup cherry tomatoes, chopped
1/2 cup fresh cilantro, chopped
2 cloves garlic, chopped
1 t cumin
1 jalapeno or red Thai bird chili, chopped
Salt and Pepper
1 t olive oil

Heat olive oil over medium heat and add chopped garlic. Add shrimp, season with cumin, salt and pepper and cook until no longer pink, about 2-3 minutes.

Remove shrimp from pan, set aside to cool. Slice width-wise.
Evenly spread one quarter of the cheese onto one tortilla.

Top with half of the shrimp, half of the tomatoes, half of the chopped chilies, half of the cilantro and half of the lime zest.

Add another quarter of the cheese on top of these ingredients.
Top with another tortilla.

Repeat to make second Quesadilla.

Lightly brush four sides of Quesadilla with olive oil and grill until browned and cheese is melted.

Serve with Fresh Guacamole, Rice and Beans!

Monday, May 2, 2011

Quinoa Salad


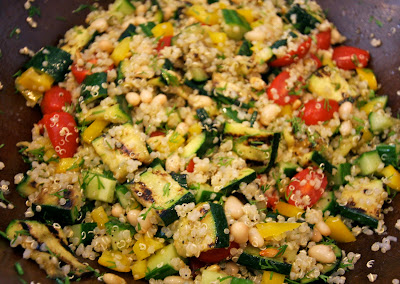
What a beautiful way to start the Week! I am in love with all of the fresh flavours of this salad, the crunchy pine nuts, the creamy beans, the chewy quinoa and the crisp veggies combined with the smokiness of the grilled zucchini and the tart citrus dressing! The best part? Don't tell anyone ... it's super healthy!   

QUINOA SALAD

1/2 cup dried quinoa, rinsed 
2 medium zucchini 
1 cup cherry tomatoes, chopped 
1 cup English cucumber, de-seeded and chopped 
1/2 medium yellow sweet pepper, chopped
1/4 cup pine nuts 
1/2 cup navy beans
1/4 cup fresh dill
Juice and zest of one lemon 
juice of one lime
1-2 T olive oil 
salt and pepper

How to Cook Quinoa: There is some debate about the proper ratio to use when cooking quinoa. I usually use a 1:2 ratio of quinoa to liquid. For the above recipe I combine 1 cup of water mixed with half of the lemon juice and all of the the lemon zest as well as a bit of salt and pepper. I usually cook my quinoa in my rice maker, but if you don't have a rice maker you can also bring the quinoa and water to a boil, cover, reduce heat and simmer for approximately 15 minutes or until the water is absorbed. Then, remove the quinoa from the heat and let stand, covered for ten to fifteen minutes. Fluff with a fork and serve!


 Cut zucchini into long strips, lengthwise. Grill over a grill pan. Let cool.  Chop into bite sized pieces.

Toast pine nuts until browned. Let cool. 

Combine cooked quinoa, chopped vegetables, pine nuts, beans, fresh dill,
remaining lemon juice, lime juice and olive oil. Season with salt and pepper.
Toss to combine. 
Serve! 

~ Serves 4 as a side salad / 2 as a dinner salad ~

Saturday, April 30, 2011

Lemon and Fennel Halibut en Papillote

 
This is one of my favourite ways to prepare fish. It's called, en papillote, which translates to mean "in parchment". Vegetables, a protein and seasonings are folded within a parchment paper parcel, and then roasted, thereby allowing the contents to steam inside the parcel. The method ensures that the fish remains moist and that the flavours are sealed in, to meld and perfume the fish. I love the fact that each person gets their own little puffed package to open, like a present, at the table. I most often use this method to cook fish, but you can also cook chicken this way, or even just vegetables, without a protein. The fact that the food is steamed also means that you can get away with using less oil, then frying would allow. Experiment with whatever you have on hand. You can also add a little white wine, for some added flavour and moisture if you want more sauce.

Bon Appetit! 

Lemon and Fennel Halibut en Papillote

1 lemon 
2 halibut steaks
1 fennel bulb, with fronds
1 T capers 
1 t olive oil 
salt and pepper


Preheat oven to 400 degrees. 

Prepare two large squares of parchment paper. 
Slice fennel bulb thinly and divide between parchment squares. Ensuring that the pile is slightly to the side of the center. 

Season the fish with salt and pepper.  
Place fish over the piles of fennel. 
Divide capers between fish.

Chop fennel fronds and sprinkle approximately 1 T over each fish steak. 
Slice lemon thinly and place lemon slices over fish steaks.

Use remaining lemon juice to sprinkle over fish. Drizzle olive oil over fish. 

Fold paper in half and crimp the edges of paper to form a half moon shape. 
Place packages on a cookie sheet and bake for approximately 10 minutes or until parcels are puffed.

~ serves two ~

 Pairs well with whole wheat couscous, and sauteed baby bok choy! 

Friday, April 29, 2011

Whole Wheat English Muffins

On this glorious spring day, I thought, what better way to celebrate the Royal nuptials then to make English muffins!! These are whole wheat with a honey flavour. They are really great fresh, or toasted with some butter or peanut butter. I also love them topped with scrambled eggs, garlicly sauteed spinach, and goat cheese.

Cheerio!


Whole Wheat English Muffins

~ makes 12 muffins ~

1/4 cup warm water (110 degrees)
1 T active yeast
2 cups whole wheat flour, plus 1/4 cup for kneading
1 cup all purpose flour
1 t salt
1 cup 2% milk
3 T canola oil
2 T honey
1 egg
cornmeal

Heat oven to 350 degrees.

Sprinkle yeast over warm water and let sit for ten minutes until frothy.

Combine flours and salt in bowl and set aside.

Warm milk over medium high heat until bubbles just start to form. Add honey and stir until dissolved. Remove from heat.

Combine egg, water, yeast, oil, and half of the flour with the milk mixture. Add remaining flour mixture and stir to combine.

Turn out onto board knead, adding more flour, one tablespoonful at a time, for several minutes, until it is no longer sticky.

Place in a well oiled bowl, cover with a damp towel and let rise for at least one hour in a warm part of your kitchen, until it has roughly doubled in size.

When dough has risen, roll onto board which is dusted well with cornmeal, into a ½ inch thickness and cut into 3 inch rounds.

Fry in a skillet, which has been dusted with cornmeal, over medium heat, for 5-7 minutes per side, or until browned.

Bake in oven until sides are set and insides are soft but no longer gooey.

Let cool on a rack.

Split with a fork or with a knife, and enjoy!


This recipe is a combination of a few that I found on the site but is adapted, for the most part, from the website, recipetips.com.

Monday, April 25, 2011

Meatless Mondays ... Hummus !!


I have been observing "Meatless Mondays" for the past little while. The initiative was born in WWI wherein families in America were asked to reduce the amount of meat they ate as a way to aid the food crisis in war torn Europe. The effort returned in WWII and was a success. Around the turn of the 21st century, the program was re-introduced as an effort to reduce American obesity and to reduce carbon emissions which resulted from large scale farming.

I am attempting to incorporate more than one meat free day per week into my diet, for health reasons and for environmental reasons. Don't get me wrong, I am absolutely a carnavore. I could not be a vegetarian, and I have no interest in giving up meat entirely. I do, however, know that if we all ate a little bit less meat, there would be a decrease in the strain that large scale farming has on our environment.

Okay, enough preaching already!!

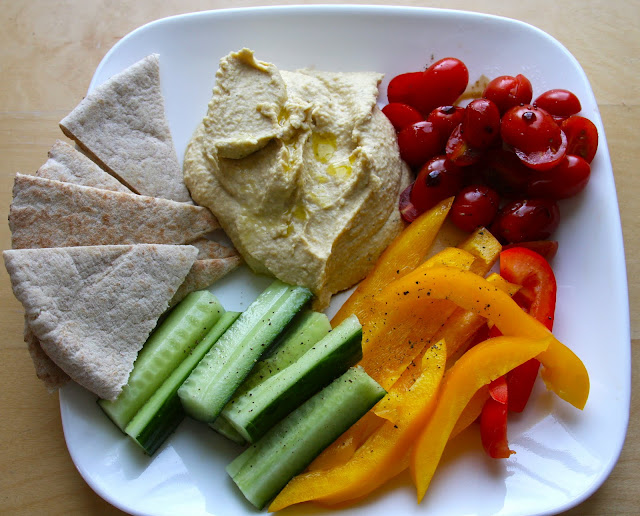
One of the easiest and (in my opinion) tastiest vegetarian/vegan lunches that I prepare on a near weekly basis is homemade hummus. Hummus is a very popular Middle Eastern dip/spread. I think if people knew how much better homemade hummus is, as compared to store bought, they would not hesitate to break out the food processor!

If you are feeling really inspired, you can get dried chickpeas and soak them overnight. Then in the morning, change the water and then bring them to a boil and simmer them for 45-60 minutes, or until tender. If you are not feeling particularly inspired, or if you are short on time, canned chickpeas work just as well!

Chickpea Hummus
2.5 cups cooked or 19 oz can, chickpeas
1-2 T tahini
juice and zest of half of one lemon
1-2 cloves garlic
1-2 T olive oil
salt and pepper

Combine ingredients in the bowl of a food processor and blend until well mixed. If mixture seems to thick, thin with a bit of water, up to one quarter cup.

Serve w/ vegetables and whole wheat pita for dipping!

Friday, April 22, 2011

Blog Makeover!!!


Where have I been you ask? Where has the time gone? I decided to take some time away to refocus and reflect on what I wanted from this blog and what I wanted this blog to become. A lot of changes have occurred in my life over the past months and I wanted to reflect these changes in the blog as well.


Firstly, we purchased a new home!! We closed in late summer, 2010. It is a beautiful Victorian historic home built in 1873. We fell instantly in love with its high ceilings and original features. It needs work, lots of work, which partially explains my M.I.A. status on the blog. We spent many long nights leading up to the Christmas break stripping floors to their original hardwood, painting, sanding and resurfacing multiple surfaces throughout the home. We have just scratched the surface. It is starting to look like a home and I love it more every time we change something new. This will be a labour of love that will last for years to come. I have decided to incorporate some of the changes into a new page on the blog, entitled "home and garden” you can find that link here!


Secondly, I became engaged!! It happened around Christmas this past December! We are planning a wedding in Italy in 2012. I have been spending lots of time looking at beautiful wedding blogs, my favourite being Snippet and Ink. I love Kathryn’s gorgeous daily inspiration boards and her accounts of the real weddings of endlessly cool couples across North America! I will detail our wedding trip and our honeymoon, along with future adventures on my new travel/adventure page “out and about” you can find that link here!


Finally, as you have likely noticed, I have a new blog design!! It is the beautiful work of the lovely Blog Fairy. What a dream come true. I couldn’t have imaged a smoother and easier process. She truly is a magic-maker! If you want more information about her services, find her link here or on the button at the bottom of the blog!


I am looking forward to the new season. We have just started planning our garden for this summer. Our new home came with a small green house so we are going to have some fun starting seeds in years to come. The winter has been holding on but I have faith that warm weather is just around the corner. I can’t wait to start cooking from my own garden again!

Cheers, and Happy Easter Weekend!!